Difference between revisions of "Programming the Device"
Jump to navigation
Jump to search
(update programmer version and menu version) |
|||
| (3 intermediate revisions by 2 users not shown) | |||
| Line 63: | Line 63: | ||
==Download and Loading Firmware== | ==Download and Loading Firmware== | ||
===dsPicProgrammer User Guide=== | ===dsPicProgrammer User Guide=== | ||
| − | [http://chungyan5.no-ip.org/ | + | [http://chungyan5.no-ip.org/download/software/dsPicProgrammer/dsPicProgrammerUserGuide_V2.0.1.pdf dsPicProgrammerUserGuide_V2.0.1] |
| + | |||
===Hardware Requirement=== | ===Hardware Requirement=== | ||
#PC (Linux/Windows) with COM Port OR USB-COM converter cable | #PC (Linux/Windows) with COM Port OR USB-COM converter cable | ||
| Line 70: | Line 71: | ||
===Software Requirement=== | ===Software Requirement=== | ||
| − | + | #[http://chungyan5.no-ip.org/vc/?root=dspicProgrammer dsPicProgrammer] | |
| − | |||
| − | #[http://chungyan5.no-ip.org/vc/?root=dspicProgrammer dsPicProgrammer] | ||
===Files=== | ===Files=== | ||
| Line 80: | Line 79: | ||
====Setup COM Port==== | ====Setup COM Port==== | ||
| − | + | [[Image:DSC00921.JPG | 480px]] | |
*Connect your USB-COM converter cable to your computer | *Connect your USB-COM converter cable to your computer | ||
*Or Using a real COM PORT | *Or Using a real COM PORT | ||
| − | |||
---- | ---- | ||
=====Find out your COM port Number===== | =====Find out your COM port Number===== | ||
| − | [[Image:1.jpg]] | + | [[Image:1.jpg | 480px]] |
*Go to Control Panel \ Device Manager | *Go to Control Panel \ Device Manager | ||
| − | |||
---- | ---- | ||
| − | [[Image:2.jpg]] | + | [[Image:2.jpg | 480 px]] |
*Find out your Device COM Port Number | *Find out your Device COM Port Number | ||
| − | |||
| − | |||
---- | ---- | ||
====Get the Dspic Programmer==== | ====Get the Dspic Programmer==== | ||
| − | [[Image:programmer_3.jpg]] | + | [[Image:programmer_3.jpg |480px]] |
*Download [http://chungyan5.no-ip.org/open_data/electronic_computer/platforms/dspic/dsPicProgrammer/dsPicProgrammer3.00.01s.zip dsPicProgrammer.zip], from [http://chungyan5.no-ip.org/open_data/electronic_computer/platforms/dspic/dsPicProgrammer/ws/ updated directory] or [http://chungyan5.no-ip.org/vc svn server] | *Download [http://chungyan5.no-ip.org/open_data/electronic_computer/platforms/dspic/dsPicProgrammer/dsPicProgrammer3.00.01s.zip dsPicProgrammer.zip], from [http://chungyan5.no-ip.org/open_data/electronic_computer/platforms/dspic/dsPicProgrammer/ws/ updated directory] or [http://chungyan5.no-ip.org/vc svn server] | ||
*Unzip the dsPicProgrammer.zip, then you have an unziped file. | *Unzip the dsPicProgrammer.zip, then you have an unziped file. | ||
| − | |||
| − | |||
---- | ---- | ||
====Download Firmware==== | ====Download Firmware==== | ||
| − | [[Image:programmer_4.jpg]] | + | [[Image:programmer_4.jpg |480px]] |
*Save your .hex file(foo.hex) to the folder called firmware. | *Save your .hex file(foo.hex) to the folder called firmware. | ||
*Run dsPicProgrammer.bat (Windows) / dsPicProgrammer.sh (linux) | *Run dsPicProgrammer.bat (Windows) / dsPicProgrammer.sh (linux) | ||
**Make sure your device is connected through a "Direct RS232 Cable" to PC Serial Port. | **Make sure your device is connected through a "Direct RS232 Cable" to PC Serial Port. | ||
| − | |||
| − | |||
---- | ---- | ||
| − | [[Image:programmer_6.jpg]] | + | [[Image:programmer_6.jpg |480px]] |
*Choose a COM port | *Choose a COM port | ||
| − | *Choose a | + | *Choose a baudrate |
::115200 is communication speed [in bps] | ::115200 is communication speed [in bps] | ||
| − | |||
| − | |||
---- | ---- | ||
| − | [[Image:programmer_7.jpg]] | + | [[Image:programmer_7.jpg |480px]] |
*Choose a .hex file | *Choose a .hex file | ||
| − | |||
| − | |||
| − | |||
---- | ---- | ||
| − | [[Image:programmer_8.jpg]] | + | [[Image:programmer_8.jpg |480px]] |
*Press start | *Press start | ||
*Then press Yes to confirm programming the device | *Then press Yes to confirm programming the device | ||
| − | |||
---- | ---- | ||
| − | [[Image:programmer_9.jpg]] | + | [[Image:programmer_9.jpg | 480px]] |
*The status during programming | *The status during programming | ||
| − | |||
| − | |||
---- | ---- | ||
| − | [[Image:programmer_10.jpg]] | + | [[Image:programmer_10.jpg |480px]] |
| − | *The | + | *The programming have been completed, press OK the close the message box |
| − | |||
| − | |||
---- | ---- | ||
Latest revision as of 23:29, 25 April 2012
Description on how to use dsPicProgrammer to download firmware to DsPIC30F 5011 Development Board
Contents
Loading Bootloader (Once only)[edit]
Hardware Requirement[edit]
- PC with USB port (with Windows)
- ICD2 Programmer
- Target Board
- 5V Power Supply
Software Requirement[edit]
- MPLAB IDE v7.50: v7.60 is not compatible with our current ICD2 Programmers. There are consistent "Devices cannot be founded" warnings. See manual for details.
Files[edit]
- dsPicBootloader (bl_$(MODEL).hex).
Procedure[edit]
| Step | Remarks |
|---|---|
| Install MPLAB IDE |
|
| Install USB Driver |
|
| Select Target Chip |
|
| Load Bootloader |
|
| ICD 2 <-> PC |
|
| Target <-> ICD 2 |
|
| ICD 2 <-> PC |
|
| Start Programming |
|
| Finishing |
|
Download and Loading Firmware[edit]
dsPicProgrammer User Guide[edit]
dsPicProgrammerUserGuide_V2.0.1
Hardware Requirement[edit]
- PC (Linux/Windows) with COM Port OR USB-COM converter cable
- Target Board (with bootloader)
- 5V Power Supply
Software Requirement[edit]
Files[edit]
- Application hex file (e.g. app.hex)
Procedure[edit]
Setup COM Port[edit]

- Connect your USB-COM converter cable to your computer
- Or Using a real COM PORT
Find out your COM port Number[edit]

- Go to Control Panel \ Device Manager

- Find out your Device COM Port Number
Get the Dspic Programmer[edit]

- Download dsPicProgrammer.zip, from updated directory or svn server
- Unzip the dsPicProgrammer.zip, then you have an unziped file.
Download Firmware[edit]

- Save your .hex file(foo.hex) to the folder called firmware.
- Run dsPicProgrammer.bat (Windows) / dsPicProgrammer.sh (linux)
- Make sure your device is connected through a "Direct RS232 Cable" to PC Serial Port.

- Choose a COM port
- Choose a baudrate
- 115200 is communication speed [in bps]

- Choose a .hex file

- Press start
- Then press Yes to confirm programming the device

- The status during programming

- The programming have been completed, press OK the close the message box
Troubleshooting[edit]
Invalid COM Port[edit]
- In case of selecting an invalid COM port, you should see the error message:
gnu.io.NoSuchPortException: Choosing COM Port Error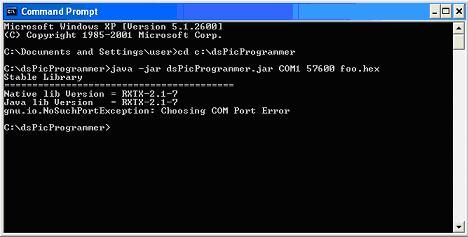
- Solution: check the COM port ID, or close any programs that are using the COM Port

Missing firmware file[edit]
- In case of selecting a firmware file that does not exist, you should see the error message:
java.io.FileNotFoundException: foo1.hex <The system cannot find the file specified>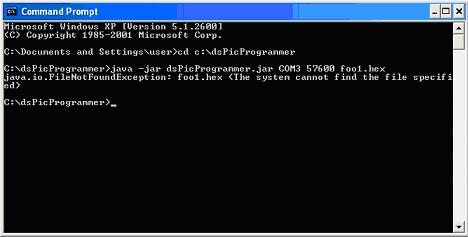
- Solution: check the file path

Missing RXTX driver[edit]
- In case of missing the RXTX driver, you should see the error message:
Exception in thread “main” java.lang.NoClassDefFoundError: gnu/io/UnsupportedCommOperationException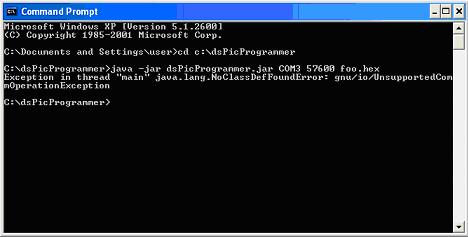
- Solution:
- Copy RXTXcomm.jar to /dsPicProgrammer/rxtx/lib
- Copy rxtxSerial.dll to /dsPicProgrammer/rxtx/bin (Window)
- Copy librxtxSerial.so to /dsPicProgrammer/rxtx/bin (Linux)

Missing JAVA[edit]
- In case of missing JAVA JDK or JRE, an error message will be prompted.
- Solution:
- Copy the contents under directory C:/Program Files/Java/jre$(VERSION)/ to /dsPicProgrammer/jre