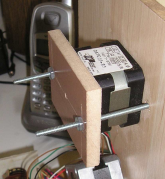
Difference between revisions of "PIC based Stepper Motor Dancing Analog Clock"
Russ hensel (talk | contribs) |
(link to related articles, etc.) |
||
| (10 intermediate revisions by 3 users not shown) | |||
| Line 10: | Line 10: | ||
This is an analog clock, with real hands driven by stepper motors. A clock for the confused dyslexics amoung us, for more informatinon on Dyslexia see DAM ( Mothers Against Dyslexia ). Because stepper motors are quite powerful the clock could be made quite large, 3 feet in diameter is probably within reach still using inexpensive ( salvage ) stepper motors. The project description includes eagle files for the circuits and a BoostC project with source code for the PIC. | This is an analog clock, with real hands driven by stepper motors. A clock for the confused dyslexics amoung us, for more informatinon on Dyslexia see DAM ( Mothers Against Dyslexia ). Because stepper motors are quite powerful the clock could be made quite large, 3 feet in diameter is probably within reach still using inexpensive ( salvage ) stepper motors. The project description includes eagle files for the circuits and a BoostC project with source code for the PIC. | ||
| − | Comming Soon: I have a second physical version of the clock that looks much nicer, including real clock hands. Code has been improved a lot as well. | + | |
| + | News: | ||
| + | * May '09 C code was missing from archive, this has been fixed. | ||
| + | |||
| + | * Comming Soon: I have a second physical version of the clock that looks much nicer, including real clock hands. Code has been improved a lot as well. ( code updated in new download below ) | ||
[[Image:ClockFace.png | Clock Face ]] | [[Image:ClockFace.png | Clock Face ]] | ||
| Line 367: | Line 371: | ||
=== Program === | === Program === | ||
| + | |||
| + | ==== Overview ==== | ||
Nothing very fancy here. The 60 Hz input is fed to the port x interrupt. This lets the PIC keep time. The hands are not moved during the interrupt instead flags requesting hand movement are set and the main loop moves the hands. | Nothing very fancy here. The 60 Hz input is fed to the port x interrupt. This lets the PIC keep time. The hands are not moved during the interrupt instead flags requesting hand movement are set and the main loop moves the hands. | ||
| Line 415: | Line 421: | ||
This interface is not necessary but can be very useful for playing around with the clock, or debugging new version of the code. | This interface is not necessary but can be very useful for playing around with the clock, or debugging new version of the code. | ||
| − | To use the serial interface you will need a cable, and perhaps a level shifter ( the Stepper Tester [[Stepper Motor Tester]] has a max232 level shifter, this circuit does not, you can get a level shifter as a seperate component or even built into a cable ). You will also need a serial terminal, generally a program for your PC. For information on a good terminal program see [PC-Microcontroller Communications#Serial_Communications_from_a_PC_to_Microcontrollers]] | + | To use the serial interface you will need a cable, and perhaps a level shifter ( the Stepper Tester [[Stepper Motor Tester]] has a max232 level shifter, this circuit does not, you can get a level shifter as a seperate component or even built into a cable ). You will also need a serial terminal, generally a program for your PC. For information on a good terminal program see [[PC-Microcontroller Communications#Serial_Communications_from_a_PC_to_Microcontrollers]] |
| − | + | Notes on terminal program set up. | |
| + | |||
| + | *Baud rate should be 19.2K 8N1 | ||
| + | *Most terminal programs can be set to treat a carriage return as a carriage return line feed. Do it. | ||
| + | Some terminal programs will not transmit in lower case ( all our commands are lower case ) unless specially set to do so. Set it to allow lower case. | ||
The clock should send debugging information about once a minute ( maybe ). It will also inform you of the changing of modes with the mode switch. | The clock should send debugging information about once a minute ( maybe ). It will also inform you of the changing of modes with the mode switch. | ||
| Line 511: | Line 521: | ||
=== Download === | === Download === | ||
| − | Note there | + | Note there may be a serious error in the schematic for the clock board. You can jumper around it if you have already made the board, else wait for version X. ( may be fixed in version 2 below, but I need to check. ) |
| − | + | Download includes the boostc project ( .c, .h, and ._c files ) some of the graphics, movie, and eagle files [http://home.comcast.net/~russ_hensel/OC/DDClock/DDClock_v2.zip Download Version 2] Questions? email me until then see [[russ_hensel]] | |
=== Comment, Questions, Contributions? === | === Comment, Questions, Contributions? === | ||
Email me [[russ_hensel]], or use the talk page for this topic. All feedback is welcome. | Email me [[russ_hensel]], or use the talk page for this topic. All feedback is welcome. | ||
| + | |||
| + | [[category:projects]][[category:Serial Communications]][[category:Microcontroller]][[category:PIC]] | ||
| + | [[category: clock]] | ||
Latest revision as of 06:09, 23 March 2014
Contents
Summary
- Name: PIC based Stepper Motor Analog Clock with Dancing Hands
- Purpose: An amusing analog clock, see below.
- Status: This is a draft. Code works but still in refinement, code available, email russ_hensel Also still refining the project.
- Technology: Stepper Motors, PIC 16F877A and BoostC
- Author: russ_hensel ( where you can find an email address to reach me )
- License: Open source and object code.
This is an analog clock, with real hands driven by stepper motors. A clock for the confused dyslexics amoung us, for more informatinon on Dyslexia see DAM ( Mothers Against Dyslexia ). Because stepper motors are quite powerful the clock could be made quite large, 3 feet in diameter is probably within reach still using inexpensive ( salvage ) stepper motors. The project description includes eagle files for the circuits and a BoostC project with source code for the PIC.
News:
- May '09 C code was missing from archive, this has been fixed.
- Comming Soon: I have a second physical version of the clock that looks much nicer, including real clock hands. Code has been improved a lot as well. ( code updated in new download below )
Major Parts
- 2 Stepper Motors -- probably can be salvaged from printers or 5 1/4 disk drives ( where I got mine )
- PIC16F877 processor -- Others can be used, but this guy has a lot of IO, quite a bit is used for the clock
- Low side Driver Chip -- but any transistors with reasonable beta and enough current handling capacity could be substuited.
- Case -- With a bit more work than I have done you could have a really nice case. I am working on an oak one now
- Clock Face -- Some good artwork here could make a really good looking clock, anyone willing to send me an high quality graphics file?
- Circuit Board -- Right now mine is built mostly on a proto board, but I have designed but not tested printed circuit boards suitable for single sided, toner transfer, fabrication.
What it Looks Like
The current case, face, and hands are pretty rough, I am working on better ones, but it may be a bit of a wait.
Still photo: see above.
Video of a couple of minutes, running at 10x but the motion of the hands in real time ( minute ticks by in 6 not 60 seconds ) Short Video of Clock
Putting a better face on it, a draft coming soon: 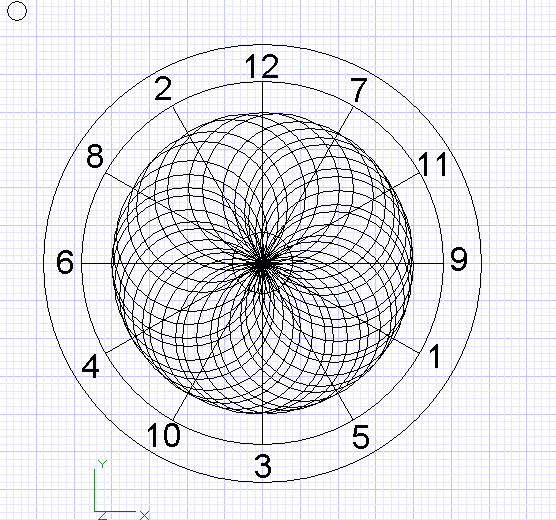
Features
| Feature | Details |
| Hour hand/ Minute Hand | Hour hand is of conventional layout, but only changes hour on the hour. The minute hand is more like an elevator floor indicator, rotates 180 degrees, moves to the next minute on the minute. |
| Special effects -- Dancing | Hour and minute hands may "dance" at special times, see the video at: Short Video of Clock |
| Power / timekeeping | Powered from outlets, timekeeping based on the powerline ( which is long term very accurate (( less power outages )) ). |
| Optional Serial Interface | For debugging and demo of special effects |
| Dual Stepper motors | Salvage from printers and floppy drives. Independent drive of each hand. |
Circuit
The circuit does not need much explanation beyond the schematic and parts list. Here is just an overview.
To make it really easy to fabricate the printed circuit boards I seperated the power supply from the processor board.
For parts I used used my junk box, when it fails consider SparkFun and Futurlec. Or..... See: Supplier.
To see the circuit and board in detail download the files and view in Eagle, the free version is fine.
Power Supply
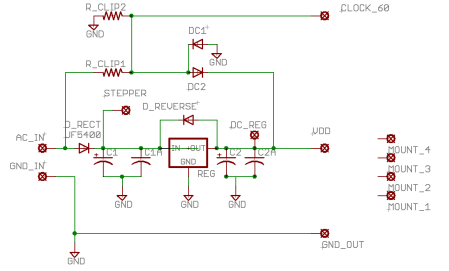
This is a straight forward half wave rectifier with a linear regulator. It is powered by a wall wart transformer rated at about 9 volts. The unregulated voltage is over 9 volts ( 9 * ( 2 ^ 1/2 )) by simple theory. This unregulated voltage is used directly by the steppers so choose you wall wart to match your stepper motors. You should also size the filter caps based on the current that will be used by the motors. A couple of volts of ripple is not a problem as long as you have enough overhead for the 5 volt regulator ( the PIC might run on less, let me know if you try it ). An important part of the power supply is a 60 hz, roughly square wave. It is clipped off from the AC input. The 60 Hz power line tends to be very accurate over the long term, less so if you suffer power outages. You could run the clock on batteries but the motors load down a battery pretty badly and you would need a different timing signal ( the original code has a subroutine for timing off the crystal ).
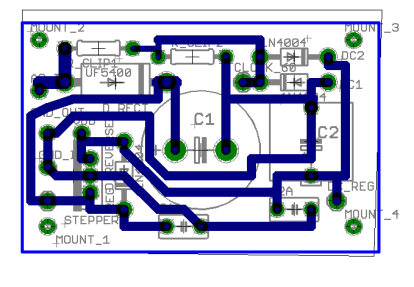
Power Supply Schematic and Board
Single sided, for toner transfer, in Eagle ( semi-final, less ground plane, files may be more up to date ) Note that I have included some parts for very conserative design, which I did not in fact use.
Parts
| Part | Details |
| Wall Wart | You need one with AC output to get the 60 Hz timing signal from the power line. Mine is a 9 v 800 ma unit. I found it somewhere. The unregulated rectified voltage should be good for your motor, so check your motor against the wall wart. The 9 volt unit does a good job of driving a 12 volt motor. Motors do not need very well regulated power. |
| D_RECT = Rectifier Diode | Size for current needed by motors, then say double. Let the reverse voltage be 4 x the input voltage. Mine came from salvage. Look on Instructables.com for similar power supplies. |
| C1 = Filter Cap | My junk box yeilded 4,700 mfd at 25 volts |
| C1A = High Frequency Bypass | .01 to 1 mfd cap with good high frequency response, mica is fine. Electrolytic to be avoided. |
| C2 = Filter Cap | Probably can skip, I did. |
| C2A = High Frequency Bypass | .01 to 1 mfd cap with good high frequency response, mica is fine. Electrolytic to be avoided. |
| DC1, DC2 = Clipping Diodes | Clip the AC for the time keeping to +5 and 0 volts. Protects the input of the PIC. I just used standard small signal diodes. |
| R_CLIP1 R_CLIP2 = Clipping Resistors | 10 k resistors, form voltage divider to the timing signal to PIC, limits current to DC1 and DC2. |
| REG = 5 volt voltage regulator. | 100 ma seems to be pleanty, use a 1 amp unit if you want. Current is only for the PIC, it is not much. I think the 1 amp unit is the 7805. |
| AC_IN | AC input from wall wart. |
| GND_IN | Other input from wall wart. |
| GND_OUT | Ground out to Processor board. |
| CLOCK_60 | 60 Hz signal to Processor board. |
| VDD | 5 volts to Processor board. |
| MOUNT_1...4 | Mounting holes. No electrical connection. |
| Stepper | Badly regulated power for the stepper motors, to the common connection on the motors. |
| xx |
Processor Board
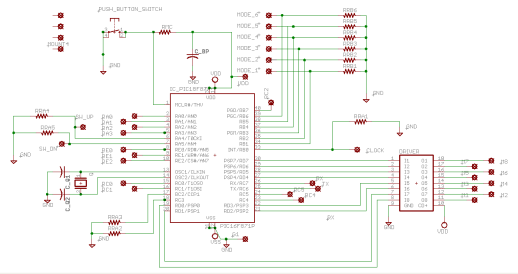
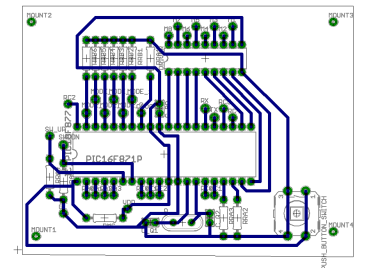
Processor Schematic and Board
Single sided, for toner transfer, in Eagle ( semi-final, less ground plane, files may be more up to date ) To get a readable copy download the Eagle files and open in Eagle, see: Techniques, Software Design Tools
Parts
| Part | Details |
| Wall Wart | You need one with AC output to get the 60 Hz timing signal from the power line. Mine is a 9 v 800 ma unit. I found it somewhere. The output voltage, when rectified, needs to be enough to drive the motor, the PIC runs off a regulator so it does not care much about the input voltage. |
| PIC16F877A | My favorate 16 series part, relatively lots of memory and pins. Bigger than you need, but only about 8 bucks. Try with an 18 series part, should not be hard and will leave you more up to date. Let me know. |
| MODE_1...MODE_6 = Rotory Switch connections | I used an old Radio Shack 12 position switch only 6 of them are used here. You could use seperate pushbuttons, the advantage is that the position of the rotory switch indicates which mode you are in, else you may want an led for each one, perhaps using another bunch of ports. |
| Single Pole double throw Momentry Switch | ( or could be 2 momentary push buttons ) one moves the hands up, the other down, in the set and adjust modes. From my junk box. |
| Pull Up/Down Resistors | 10k more or less |
| CQ1, CQ2 = capicators for the crystal | about 20 pf seems to work, see the PIC16F877A manual |
| Q = crystal | 4 meg Hz is what I used. May be quite a bit faster than needed, I have not looked into this. The 4 meg crystal seems to work ok on a proto board. Note that some of the code is dependent on this frequency, but could be fairly easily changed. |
| RA4, RA5 = Pull up resistors | 10K more or less |
| RB1 ... RB6 = Pull up resistors | 10K more or less |
| RRA2, RRA3 = Pull up resistors | 10K more or less |
| C_BP = By Pass Cap. | .01 to .1 mfd mica or other by pass cap, good at high frequency seems good. |
| RRA1 = Pull Up resistor | 10K more or less |
| DRIVER = Driver | Driver chip for stepper. ULN2803. Good for up to .5 amp 35 volts I think. Could use discrete transistors ( possibly darlingtons ) if you want higher current. You should not need more current unless you make a really big clock. |
| RMC = Pull up resistor for master clear ( pull down with push button switch to reset ). | 10k more or less |
| PUSH_BUTTON_SWITCH = Reset | Push to reset the processor. Mine was from salvage. |
| CLOCK = Clock input signal | Connect to CLOCK_OUT on power supply. |
| VDD = Positive Power | 5 volts from power supply. |
| G1 = Ground Connection | To the power supply. |
| SW_UP, SW_DOWN = Setting switch | I used a momentary double throw, single pole, you could use 2 momentary push buttons. |
| MOUNT_1...4 | Mounting holes. |
Program
Overview
Nothing very fancy here. The 60 Hz input is fed to the port x interrupt. This lets the PIC keep time. The hands are not moved during the interrupt instead flags requesting hand movement are set and the main loop moves the hands.
Invalid states for the mode can easily happen with a rotory switch when the wiper is not fully in position. Because of this not all possible states on the mode input are used.
The stepper control is half step. The activation of the coils is determined by an array which hold the 8 different activations of the coils. My stepper motor has 200 full steps ( 400 half steps ) per revolution. You should be able to adjust the code for different steppers. Much of the steppeer code is very similiar to that in Stepper Motor Tester which may or may not have a better explanation of the code which drives the stepper motor.
For the serial interface code see Serial Communications Library -- BoostC and 16F877A
I have tried to have pretty good comments in the code, any comments on the comments ( helpfull one please ) let me know.
Compiling
The zip file contains the entire source bootst project. Unzip into a directory and open in source boost. There are some additional notes at the top of the main source file. Follow the instructions there, they will tell you about any compiler and/or linker options, and report on memory usage from a recent compile of mine. The compile should run without error.
If you do not wish to compile you can use the precompiled hex version also included in the zip archive.
Building the Clock
My first case is just a 3/4 inch board with a thinner ( about 1/4 inch ) board mounted perpendicularly to it for the face of the clock. Mounting the stepper motors can be problematic as the ones I encountered had no mounting tabs or holes. What I finally came up with is to drill a fairly large hole ( about 1 inch ) that matches a slightly raised cylinder around the shaft. Then bolt a plate across the back of the motor and sandwich the motor up against the hole. It holds well, centers up nicely, and is easy to take apart.
The face is just a piece of light cardboard with the face drawn on it. Be as creative as you can. You should be able to do better than my attempt. My hands are bamboo skewers from the kitchen drawer. They are pushed perpendicularly through a short piece of aquarium tubing which then slips over the motor shaft. Seems to work pretty well.
You should be able to make a much better looking clock, I am working on one and will report back later.
Running the Clock
Without the Serial Interface
- Before plugging it in set the hands to 12 oclock and and 0 minutes ( if the hands are accessable, else skip this ).
- Plug in. The hands should spin a bit and then stop.
- The clock will be set to 12:00 and will immediately start running. But the hands may not be initialized or adjusted to the correct zero positions. To adjust them change the mode switch to Adj Hour Hand and manipulate the up down switch untill the hour hand moves to 12:00 ( this does not change the internal time of the clock ), switch to Adj Minute Hand and adjust it to 0 minutes.
- Switch the clock back to run, the hands may move a bit, the time is very near 12:00 ( unless it took you a long time to adjust the hands ).
- Switch to set hour to set the correct hour.
- Switch to set minute to set the correct minute.
- Switch to run and enjoy.
With the Serial Interface
This interface is not necessary but can be very useful for playing around with the clock, or debugging new version of the code. To use the serial interface you will need a cable, and perhaps a level shifter ( the Stepper Tester Stepper Motor Tester has a max232 level shifter, this circuit does not, you can get a level shifter as a seperate component or even built into a cable ). You will also need a serial terminal, generally a program for your PC. For information on a good terminal program see PC-Microcontroller Communications#Serial_Communications_from_a_PC_to_Microcontrollers
Notes on terminal program set up.
- Baud rate should be 19.2K 8N1
- Most terminal programs can be set to treat a carriage return as a carriage return line feed. Do it.
Some terminal programs will not transmit in lower case ( all our commands are lower case ) unless specially set to do so. Set it to allow lower case.
The clock should send debugging information about once a minute ( maybe ). It will also inform you of the changing of modes with the mode switch.
Then send an ! to the clock, the clock should respond with "Stopped; turn on serial mode" and you can then use the commands in the following table.
Command table:
| Command | Action |
| ! | Stop whatever is running, enter serial control mode. |
| Hn<cr> | set clock to hour n ( n is one or two digits ) and move the hands, but no dancing. |
| Mn<cr> | set clock to minute n ( n is one or two digits ) and move the hands, but no dancing. |
| R<cr> | Report on clock status |
| Dn<cr> | Dance the clock to hour n ( n is one or two digits ). Only move thg hour hand. Use to review debug the dance. |
| A<cr> | Adjust the hands to their 0 positions ( 12:00 ). If they are not correctly line up use the J and Y commands below |
| Yn<cr> | ( Y is above the H ) adjust the hour hand by an amount n, where n is a signed number from about -100 to 100. |
| Jn<cr> | ( J is above the M ) adjust the minute hand by an amount n, where n is a signed number from about -100 to 100. |
| X<cr> | Exit serial control, return to control by mode switch |
Additional Ideas
- Add a chime perhaps using an D to A converter and small amp and speaker.
- Add an LED to show the clock is powered or running, make blink at 1 hz if that pleases you ( I do not like the blink ).
- Work on more dances.
- The mode control is based on inputs that are pulled down, the chip has an option for weak pull up on the port, using this and pulling down with the mode switch would get rid of a bunch of resistors on the board.
- Add battery backup to keep the internal time ( but not the hands ) running during a black out.
- Make it really big; the motors would probably drive a 3 foot diamater unit.
- For a related project see: Stepper Motor Tester
- Some clever gears might let you mount the hour and minute hands around the same axis, maybe start from some cheap clock or clock movement.
- Clock faces and hands can be bought ( google it ). Maybe they could be usefully incorporated.
Modifications You May Need to Make
Motors vary, you want to know what the voltage, current, and step size is for your motor. The stepper tester project Stepper Motor Tester can be useful for this. It should give you the number of steps and tell you if your voltage is suitable. The motor only runs from time to time so some overvoltage is probably ok. If the number of half steps is different from 400 you can change the program and the layout of the minute hand to accomidate. A 7.5 degree per step motor has 96 half steps per rotation, use 60 of thes for a minute hand which will now swing over 180 degrees, I think you can still fit this on the dial. Not that the circuit for both the stepper tester and the clock are good for only 500ma so motors that use more than this will need a different driver. Comments in the code should help you modify the code for different numbers of steps and/or different dial layouts.
Download
Note there may be a serious error in the schematic for the clock board. You can jumper around it if you have already made the board, else wait for version X. ( may be fixed in version 2 below, but I need to check. ) Download includes the boostc project ( .c, .h, and ._c files ) some of the graphics, movie, and eagle files Download Version 2 Questions? email me until then see russ_hensel
Comment, Questions, Contributions?
Email me russ_hensel, or use the talk page for this topic. All feedback is welcome.

