Difference between revisions of "RS232 Dev Board"
| Line 5: | Line 5: | ||
<br>The thick blue lines represent a bus which contains all the important signals. I hope to update this again once I try my board. | <br>The thick blue lines represent a bus which contains all the important signals. I hope to update this again once I try my board. | ||
<br><br>In the circuits above, the two 1N4148 diodes prevent any negative voltage getting into the rest of the circuit if either DTR or RTS would happen to go negative. The two transistors function as transistor switches. The transistors also act as inverters. We need to invert things since the pc serial port uses positive voltage to represent binary 0 and negative voltage (or lucky for us 0 voltage) for binary 1. Of course the voltage regulator regulates the voltage with some decoupling capacitors. A zener diode can also be used to regulate the voltage. In my schematics, you can see that I developed this for my PIC projects, but other microcontrollers will probably have similar serial communications methods and similar supply voltage requirements. | <br><br>In the circuits above, the two 1N4148 diodes prevent any negative voltage getting into the rest of the circuit if either DTR or RTS would happen to go negative. The two transistors function as transistor switches. The transistors also act as inverters. We need to invert things since the pc serial port uses positive voltage to represent binary 0 and negative voltage (or lucky for us 0 voltage) for binary 1. Of course the voltage regulator regulates the voltage with some decoupling capacitors. A zener diode can also be used to regulate the voltage. In my schematics, you can see that I developed this for my PIC projects, but other microcontrollers will probably have similar serial communications methods and similar supply voltage requirements. | ||
| + | <br> | ||
| + | One thing I needed to do to use this with my solderless breadboard was to connect the metal on the bottom of the breadboard to ground. You may need a similar sort of grounded shielding near your circuitry if you use this. | ||
Revision as of 11:50, 18 September 2006
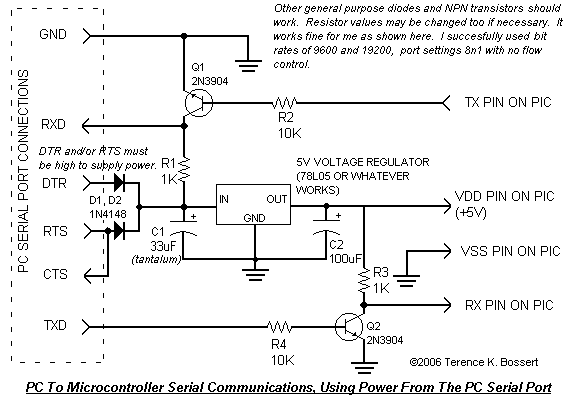
A simple RS232 example project that takes all the power it needs from the serial port. Use it to power your microcontroller and communicate between serial port and microcontroller. Takes advantage of the fact that pc serial ports will accept 0-5V rather than the RS232 standard of around negative 10V to positive 10V. Very convenient - no external power required! Note that you may use either a 5.1V zener or a 5V regulator.

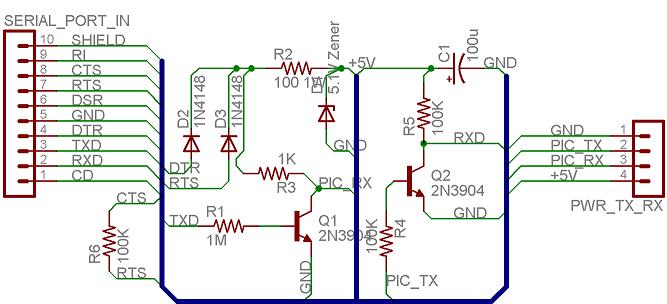
Another version, using a zener - I recently ordered a pcb for this one:

The thick blue lines represent a bus which contains all the important signals. I hope to update this again once I try my board.
In the circuits above, the two 1N4148 diodes prevent any negative voltage getting into the rest of the circuit if either DTR or RTS would happen to go negative. The two transistors function as transistor switches. The transistors also act as inverters. We need to invert things since the pc serial port uses positive voltage to represent binary 0 and negative voltage (or lucky for us 0 voltage) for binary 1. Of course the voltage regulator regulates the voltage with some decoupling capacitors. A zener diode can also be used to regulate the voltage. In my schematics, you can see that I developed this for my PIC projects, but other microcontrollers will probably have similar serial communications methods and similar supply voltage requirements.
One thing I needed to do to use this with my solderless breadboard was to connect the metal on the bottom of the breadboard to ground. You may need a similar sort of grounded shielding near your circuitry if you use this.